Akihabara Tutorial, Part 4: Scrolling Map
This is the fourth tutorial in a multi-part tutorial series where we will teach you how to make an 8-way shooter in HTML5 and JavaScript using the Akihabara framework. Akihabara is a set of Javascript libraries that take advantage of some of HTML5’s unique features to facilitate game creation. One of the best things about writing a game in HTML5 is that it will run in any browser that supports HTML5 on any platform. This includes Chrome, Firefox, Safari, and WebKit browsers on iPhone/iPad, WebOS devices, and other mobile platforms.
In this tutorial, we will make a much larger map than the one we made in part 3, and we’re going to show you how to make a camera so that the map scrolls as the player moves around. We’re assuming you’re following along with our tutorial and are working with the code you made in parts 1 through 3.
The final product
In the end we’re going to have something that looks like this. Use the Z key to advance past the title screen, and use the arrow keys to move around. Notice how the camera moves along with the player object.
A bigger map
The first thing we’re going to need for a scrolling map is, well, a map that is bigger than the screen. This is easy enough to do. We can just add more data to our loadMap function, providing it a map of twice the width and height.
[js] function loadMap() {
return help.asciiArtToMap([
"xxxxxxxxxxxxxxxxxxxxxxxxxxxxxxxxxxxxxxxxxxxxxxxxxxxxxxxxxxxxxxxxxxxxxxxxxxxxxxxx",
"x xx xx x",
"x xx xx x",
"xxxxxxxx x xx xxxxxxxxx x xx x",
"x x xxxxxxxxxx xx x xxxxxxxxxx x",
"x x xx x x",
"x x xx x x",
"x xxxx xxxxxxxxx xxxxxxxxx xxxx xxxxxxxxx xxxxxxxx",
"x xx xx xx x",
"x xx xx x",
"xxxx xx xxx xx x",
"x xxxxxxxxx xx xxxxx xxxxxxxxx xx x",
"x xx xx xx x",
"x xx x xx xx x x",
"xxxxxxx xxxxxxxxxxxx x xxxxxxxx xxxxxxxxxxxx x x",
"xxxxxxx xxxxxxxxxxxx x xxxxxxxx xxxxxxxxxxxx x x",
"x xx xxxx xx xx xxxx x",
"x xx x xx xx x x",
"xxxxxxxx x xx x xxxxx x xx x x",
"x x xx xx x xx x",
"x x xx xx x xx x",
"x x xx xx x xx x",
"x xxxx xxxxxxxxx xx xxxx xxxxxxxxx x",
"x xx xx xx x",
"xxxx xxxxx x",
"x x",
"x xxxxxxxxx xx xxxxxxxxx xx x",
"x xx xx xx x",
"x xx xx x",
"x xx xx x",
"x xx xx xx x",
"x xx xx xx x",
"xxxxxxxx x xx xxxxxxxxx x xx x",
"x x xxxxxxxxxx xx x xxxxxxxxxx x",
"x x xx x x",
"x x xx x x",
"x xxxx xxxxxxxxx xxxxxxxxx xxxx xxxxxxxxx xxxxxxxx",
"x xx xx xx x",
"x xx xx x",
"xxxx xx xxx xx x",
"x xxxxxxxxx xx xxxxx xxxxxxxxx xx x",
"x xx xx xx x",
"x xx x xx xx x x",
"xxxxxxx xxxxxxxxxxxx x xxxxxxxx xxxxxxxxxxxx x x",
"xxxxxxx xxxxxxxxxxxx x xxxxxxxx xxxxxxxxxxxx x x",
"x xx xxxx xx xx xxxx x",
"x xx x xx xx x x",
"xxxxxxxx x xx x xxxxx x xx x x",
"x x xx xx x xx x",
"x x xx xx x xx x",
"x x xx xx x xx x",
"x xxxx xxxxxxxxx xx xxxx xxxxxxxxx x",
"x xx xx xx x",
"xxxx xxxxx x",
"x x",
"x xxxxxxxxx xx xxxxxxxxx xx x",
"x xx xx xx x",
"xxxxxxxxxxxxxxxxxxxxxxxxxxxxxxxxxxxxxxxxxxxxxxxxxxxxxxxxxxxxxxxxxxxxxxxxxxxxxxxx",
], [ [null, ‘ ‘], [0, ‘x’] ])
}[/js]
Initializing the camera
Next up we implement the camera itself. We’re going to do this inside the blit function for our map, right before we call gbox.blit.
[js] // Center the camera on the player object. The map.w and map.h data tells the camera when it’s hit the edge of the map so it stops scrolling.
gbox.centerCamera(gbox.getObject(‘player’, ‘player_id’), {w: map.w, h: map.h});[/js]
The gbox.centerCamera function is passed two parameters: the object that the camera is supposed to follow, and a bounding box for the camera that it’s not supposed to scroll outside of. For our purposes, the bounding box is just the width and height of the overall map, since we don’t want to see outside of the map area.
Note: after adding this, you may see a bug in Firefox where the player sprite does not show up. Try using Safari or Chrome to get around this until later in the tutorial when we swap that line of code out for our own, custom code that obviates the bug.
The gbox.getObject function simply returns the handle of an object you specify. Its two parameters are the object’s group and the object’s id. This function is the best way to refer to objects from within other objects.
It’s alive!
Our camera is now working. Your code should behave something like this. But there’s something that feels a little wrong about our camera movement. Take a look at this:
When we move the player object around, the camera follows even our slightest movement. This makes the game annoyingly jerky. You might get a little seasick from all the moving around you’re going to do in the game. What we’re going to do to address that is add a dead zone to the camera.
Camera “dead zones”
A dead zone is an area in the center of the screen where the camera does not actually track the player. When a player moves around inside the dead zone, the camera doesn’t move. When the player moves past the edge of the dead zone, the camera moves along with the player. This means that small movements within the center of the screen (the main area of action) don’t cause the screen to move. It feels nicer. The following video illustrates the dead zone in Super Mario Bros. 3.
The dead zone in Super Mario Bros. 3 is a very narrow horizontal band, almost easy to miss, but it’s definitely there. Dead zones in general are extremely subtle — we never even noticed them until we read Steve Swink’s excellent book Game Feel.
Implementing a dead zone
We’ll create a new camera function, modeling it on the centerCamera function where we pass it the player object and the information about the width of the overall map. This will go at the bottom of our code, right before the </script> tag.
[js]function followCamera(obj,viewdata) {
}[/js]

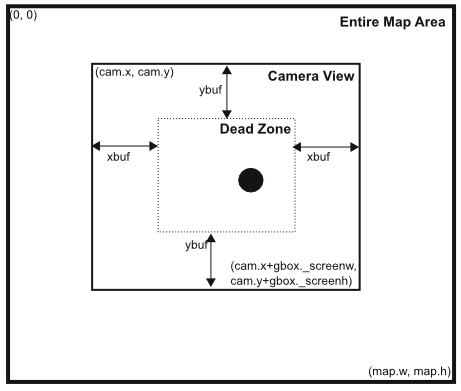
This diagram illustrates the different positional properties of the camera, deadzone, map, and player.
The math for a dead zone is simple but takes a minute to wrap your head around. The first step is to define xbuf and ybuf, which define the buffer area around our dead zone, which you can see in the diagram above. We also need to know where the camera’s current x and y positions are. We define that inside the function like this:
[js]xbuf = 96;
ybuf = 96;
xcam = gbox.getCamera().x;
ycam = gbox.getCamera().y;[/js]
We set the size of the horizontal and vertical dead zone to 96 pixels, and call the gbox.getCamera function to retrieve the camera object for our calculations.
Since the only time we move the camera is when the player is outside the dead zone, we need to write some code that detects when that happens.

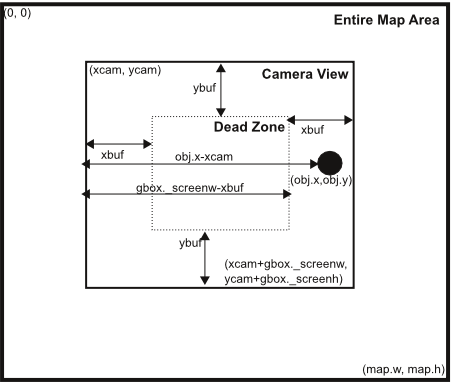
This shows the properties we need to take into account when calculating the new camera position when an object leaves the dead zone.
Let’s start with the player moving to the right. As you can hopefully see from the diagram above, the player is to the right of the dead zone when (obj.x – xcam), which is the distance from the left side of the screen to the player object, is greater than (gbox._screenw – xbuf), which is the distance from the left side of the screen to the rightmost edge of the dead zone. If the former is greater than the latter, then we want to move the camera to the right by exactly the amount of the difference, which will cause the player sprite to remain on the rightmost edge of the dead zone. Our code looks like this, evaulating whether we’re to the right of the dead zone and then adding that amount to the xcam variable and setting the camera to that number:
[js]if ((obj.x – xcam) > (gbox._screenw – xbuf)) gbox.setCameraX( xcam + (obj.x – xcam)-(gbox._screenw – xbuf),viewdata);[/js]
Similarly, we want to know when the distance between the player object and the left side of the screen (obj.x-xcam) is less than the distance between the left side of the screen and the beginning of the dead zone (xbuf). As above, we calculate the difference but this time it’s a negative number, which ends up subtracting from xcam and moving our camera to the left.
[js]if ((obj.x – xcam) < (xbuf)) gbox.setCameraX(xcam + (obj.x – xcam) – (xbuf),viewdata);[/js]
Lucky for us, we can just replace “x” with “y” and “w” with “h” and get the code for the y axis since it’s the same math with different variables.
[js]if ((obj.y – ycam) > (gbox._screenh – ybuf)) gbox.setCameraY( ycam + (obj.y – ycam)-(gbox._screenh – ybuf),viewdata);
if ((obj.y – ycam) < (ybuf)) gbox.setCameraY(ycam + (obj.y – ycam) – (ybuf),viewdata);[/js]
And that’s it. The completed followCamera() code should look like this:
[js]function followCamera(obj,viewdata) {
xbuf = 96;
ybuf = 96;
xcam = gbox.getCamera().x;
ycam = gbox.getCamera().y;
if ((obj.x – xcam) > (gbox._screenw – xbuf)) gbox.setCameraX(xcam + (obj.x – xcam) – (gbox._screenw – xbuf), viewdata);
if ((obj.x – xcam) < (xbuf)) gbox.setCameraX(xcam + (obj.x – xcam) – xbuf, viewdata);
if ((obj.y – ycam) > (gbox._screenh – ybuf)) gbox.setCameraY(ycam + (obj.y – ycam) – (gbox._screenh – ybuf), viewdata);
if ((obj.y – ycam) < (ybuf)) gbox.setCameraY(ycam + (obj.y – ycam) – ybuf, viewdata);
}[/js]
Adding the new camera
Finally we just need to replace our gbox.centerCamera function call with our new camera function. Go back into the addMap function and replace gbox.centerCamera with followCamera instead, so it looks like this:
[js] // Center the camera on the player object. The map.w and map.h data tells the camera when it’s hit the edge of the map so it stops scrolling.
followCamera(gbox.getObject(‘player’, ‘player_id’), { w: map.w, h: map.h });[/js]
Lights, something, action!
The final code you produce should behave like this. Here’s a video of the expected behavior, where there’s a noticeable dead zone in the middle of the screen so that minor movements don’t cause camera motion.
[aki_tut_toc full_url=”“]

{ 4 comments… read them below or add one }
Ah! I’ve finished translating this tutorials into Chinese.
What’s next?
When will we get the part 5?
This is a really grate tutorials for Akihabara!
The next tutorial will be up soon — I’m waiting for a small bugfix in Akihabara to be posted. We’re moving over to v1.2 for the next one!
%s/tutorials/tutorial
sorry!
[WORDPRESS HASHCASH] The poster sent us ‘0 which is not a hashcash value.
Really, really I have to say this:
It’s a huge huge huge setback to see that I have to download your part 3 code. For the sake of others that will come upon these tutorials… please fix the first two parts. The wonderful feeling of making your own code and seeing it evolve as you progress through the tutorials is ruined by started from someone elses- in the end it feels like you just didn’t do -all of it- yourself.
{ 6 trackbacks }